How To Draw Your Own Wacky R – Six Steps
How to draw your own wacky R
A step-by-step attraction manual for your wacky letter R In this guide we have for you, we’ll focus on the eighteenth letter in the letter set – the letter R. It’s only appeared a few times in this guide before, and it’s a standard letter. ! You may also learn many things cartoon drawing, scary drawing, cartoon drawing, cute drawing, flowers drawing, cute drawing, step by step car drawing puppy drawing, and dog drawing.
That’s why we’re giving you the wacky treatment as we discover how to attract a wacky letter R in just 6 silly things and simple tasks. We’ve got a great plan, and we’ll show you the best way to draw it efficiently and with style. This, however, we must also leave room for our imagination. We’ll cover a few ways to bring our imagination to the plan each time we dwell on our thoughts. We’ll also be heading north for a few more ideas you can use to push the plan much further. So with all that said, how about starting with the initial step of the wizard? Step-by-step instructions for drawing your own wacky R
We should start
Level 1:
The Most Efficient Method to Draw Your Own Wacky R Step 1 In this wizard, we don’t just draw a formal letter R. It will be a wild take on it, so it involves a lot of extra niceties. We’ll draw the first of these subtleties now, but we suggest drawing a complex variant of the letter R first. This letter is more complicated than the others, especially about the uppercase variant we will do here. To do this, using the lightest pencil, you need to write the lyrics in a way that’s easy for you is the best way to go. It’s not something you have to do, but it will make your job much easier. When you are ready, we can start drawing the significant development of the plan.
This twist will be like a vast winding connected to the upper left half of the letter. When drawing this twist, there are two methods to achieve it. You can draw it into each of the regular long-bending lines. Or, on the other hand, you can use two lines that line up with each other to do the winding. As may be obvious, there will also be a sharp point at the focal point of the twist. We can start drawing the authentic card in the next step with this draw.
2nd step :
The most effective way to draw your own Wacky R 2 level
Next, we will draw the rest of the left side of this letter R. We will start this step on the right, and it will pick up where we left off in the previous step. You can do this by drawing a small pointed shape at the highest point of the letter, interacting directly with the top winding. This slight pointy shape will bend a little to the side. Next, we’ll set a rising boundary from the wrap at the top.
It will have an extremely slight bend and twist sideways, step by step. Then it will twist a lot more until you have a second wind on the other side of the last twist. You will also see that this last winding is significantly larger than the first. Try to follow the reference image we display as carefully as possible! In the next step, we’ll be ready to polish the rest of the design of this card.
Step 3:
Instructions for drawing your wacky R level 3
As we mentioned in Sync 2, the next step will be tweaking the frame of your wacky letter R. A lot is going on in this step, so we’ll break it down into smaller parts. Start by defining an edge curved from the tapered shape to the highest point of the letter. Then at this stage, we will draw the “leg” of the letter. This will be drawn using slightly startling lines that spread out and end at a sharp point.
You can then attach this leg to the base twist you drew earlier. Then, at this stage, it remains only to draw the opening at the focal point of the letter. It’ll usually be simple on a typical R letter, but we’ll make it a little weirder here. This shape will have a straight line going up on the left; a curved line will be on the right side. That’s it, and then the design is done! If you’ve already drawn a pencil guide, you should remove it now, as you won’t need it now.
Step 4:
The most efficient way to draw your wacky step R 4
The diagram is complete, and we can now draw some intricacies around the letter R. As you can see in the reference image, we started with a spiral line at the top and bottom points of the letter. You can add a few more in case you need them too! Then we add some subtleties as part of the letter. For our variation, we filled the inside of the letter with beautiful wavy lines to give it a more detailed look. It looks perfect, but many other ways exist to complete this design.
You can choose another example, fill it with small shapes or whatever you can imagine! Here you can be innovative. You can use our plan, a minor deviation from it, or look for something completely different. Then in the next step, we’ll add some niceties around the lettering, so we should get there when I’m done with those niceties!
Step 5:
Instructions for drawing your wacky R-level 5
Now let’s add some final subtleties around the map. These subtleties are simple, but they can help rejuvenate this plan. To start, we added a few stitches along the outer edge of the letter. We’ve kept this negligible, but you can add more. Next, we added some small teardrop shapes to the outer edges of the twists at the bottom left and right of the letter. Again, if you like how they look, you can add many more to the plan if you need to. We end up with some intricacies of near-plane baselines in different letter marks.
Step 6:
The most efficient method to draw your wacky step R 6
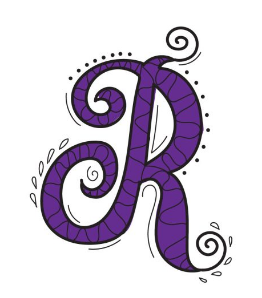
There aren’t many things that rejuvenate a design more than variety, and that’s precisely what we will include in this last step of the help. In our reference image, we’ll show you our approach to shading this letter, but it’s one of many possible outcomes. We chose a dark purple shade for the font, giving it a nice look! If you like the variety we chose for this letter, you can replicate the quest for your letter. Or, there are so many different shades you can explore! Everyone has a favourite colour, and you can enter the draw. You don’t have to stick to just one shade, as there are countless ways to add many varieties.
THE